
In the world of computers, efficiency and optimization are key. One aspect that can significantly impact the performance of your PC is the swap file, also known as the paging file. This hidden system file plays a crucial role in managing virtual memory on your Windows operating system. However, there are instances where disabling the swap file can be beneficial, especially if you have ample RAM or are using an SSD. In this article, we will explore what the swap file is, why you might want to disable it, and three methods to do so in Windows 10 or 11.
What is a Swap File?
Before we delve into disabling the swap file, let’s understand what it actually does. In simple terms, a swap file allows your computer to use a portion of your hard drive as extra memory when your physical RAM becomes insufficient for running all active applications. It functions as a temporary storage space for data that would typically reside in RAM.
The swap file works by moving data between RAM and the hard drive, which is slower compared to accessing data directly from RAM. By utilizing this virtual memory system, your computer can continue running applications even when your physical RAM reaches its limit.
Why Disable the Swap File?
Now that we know what the swap file does let’s explore why you might consider disabling it:
- Ample Physical RAM: If you have an abundant amount of physical RAM (16GB or more), it may be unnecessary to rely on virtual memory provided by the swap file. Disabling it can free up valuable disk space and potentially improve overall system performance.
- SSD Usage: Solid-state drives (SSDs) are significantly faster than traditional hard disk drives (HDDs). Since accessing data from an SSD is much quicker than reading from a mechanical HDD, relying on virtual memory stored on an SSD may not provide a noticeable performance benefit. Disabling the swap file can reduce unnecessary read and write operations on your SSD, potentially extending its lifespan.
- Specialized Workloads: Certain tasks, such as video editing or 3D rendering, can generate large amounts of data that exceed the capabilities of both physical RAM and virtual memory. In these cases, relying solely on physical RAM and disabling the swap file can improve performance by avoiding excessive disk usage.
Now that we understand some of the reasons why you might want to disable the swap file let’s explore three methods to accomplish this in Windows 10 or 11.
Method 1: Adjusting Virtual Memory Settings
The first method involves adjusting the virtual memory settings in Windows. Here’s how:
- Open System Properties: Right-click on the “This PC” or “My Computer” icon on your desktop and select “Properties.” Alternatively, you can press Windows key + Pause/Break key to open System Properties directly.
- Access Advanced System Settings: In the System Properties window, click on “Advanced system settings” located in the left sidebar.
- Open Performance Options: Under the “Advanced” tab within System Properties, click on “Settings” under the Performance section.
- Modify Virtual Memory Settings: In the Performance Options window, navigate to the “Advanced” tab and click on “Change” under Virtual Memory.
- Disable Paging File: Uncheck the box that says “Automatically manage paging file size for all drives.”
- Remove Swap File: Select each drive listed under “Drive [Volume Label]” and choose “No Paging File.” Click “Set,” then apply changes by clicking “OK.”
By following these steps, you will have effectively disabled the swap (paging) file in Windows 10 or 11 using virtual memory settings.
Method 2: Using Command Prompt
If you prefer a command-line approach, Windows Command Prompt offers an alternative method to disable the swap file. Here’s how:
- Open Command Prompt: Press the Windows key, type “cmd,” and press Enter to open Command Prompt.
- Run Command as Administrator: Right-click on Command Prompt in the search results and select “Run as administrator.”
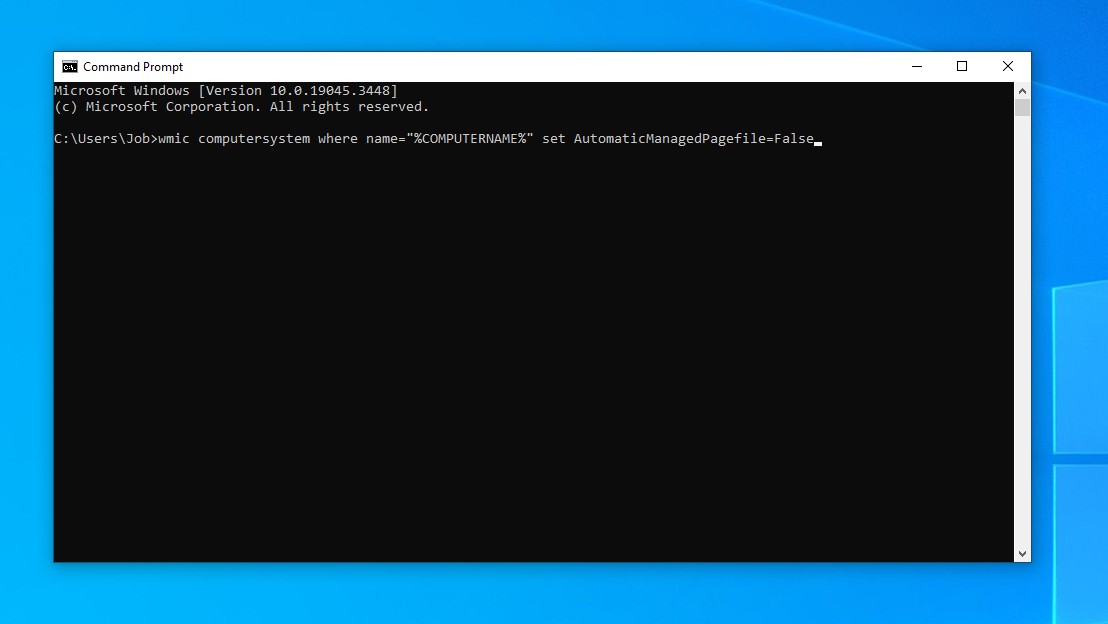
- Disable Swap File: In the elevated Command Prompt window, type the following command and press Enter:
wmic computersystem where name=”%COMPUTERNAME%” set AutomaticManagedPagefile=False
- Restart Computer: To apply the changes, restart your computer.
By executing these commands, you will have successfully disabled the swap (paging) file using Command Prompt.
Method 3: Editing Registry Values
The third method involves editing registry values to disable the swap file. Please note that modifying registry settings can have unintended consequences if done incorrectly. Proceed with caution and follow these steps precisely:
- Open Registry Editor: Press Windows key + R, type “regedit” in the Run dialog box, and hit Enter to open Registry Editor.
- Navigate to Virtual Memory Settings: In Registry Editor, navigate to the following path:
HKEY_LOCAL_MACHINE\SYSTEM\CurrentControlSet\Control\Session Manager\Memory Management
- Modify PagingFiles Value: Double-click on “PagingFiles” in the right-hand pane of Memory Management.
- Remove Swap File Entries: Delete all entries in the “Value data” field but make sure to keep “(No Name)” intact.
- Restart Computer: Save your changes by clicking “OK,” then restart your computer for the changes to take effect.
By following these steps carefully, you will have disabled the swap (paging) file using Registry Editor.
Conclusion
Disabling or removing the swap (paging) file in Windows 10 or 11 can be a viable option for PC users with ample physical RAM or those utilizing SSDs. By understanding the purpose of the swap file and considering your specific system requirements, you can make an informed decision on whether to disable it. We explored three methods to accomplish this, including adjusting virtual memory settings, using Command Prompt, and editing registry values. Remember to proceed with caution when making changes to your system settings and always back up important data.